
Registering a company in India has become easier than ever before. Registration of the company has shifted online, thereby making the process more user-friendly and flawless!
Documents Required to Register a Company in India are as follow :
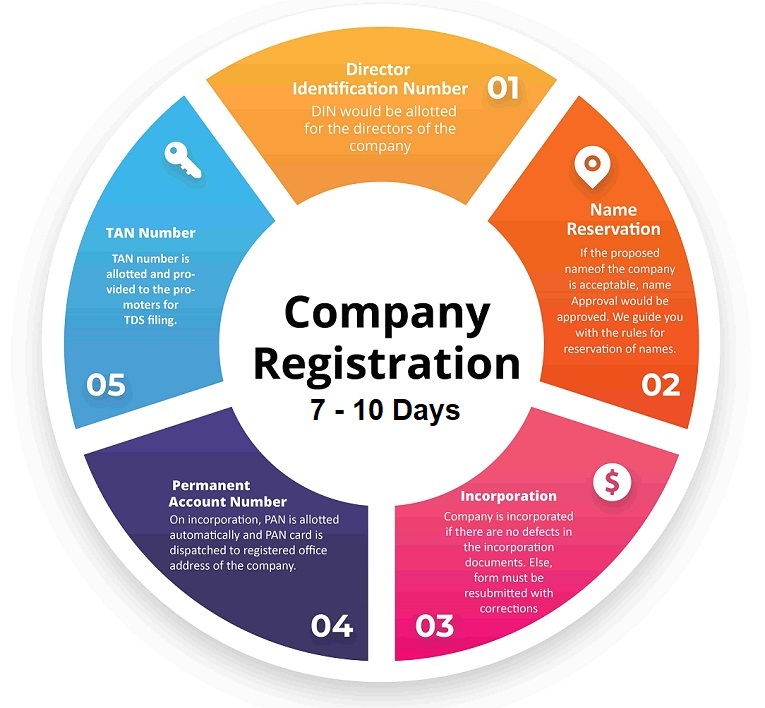
The government has introduced a Simplified Proforma for Incorporating a Company Electronically (SPICe), an integrated single-point application that enables the stakeholders to carry out legalities of company registration. The portal can be used to complete formalities such as Company Name Registration, Allotment of DIN (for Directors and Incorporation) along with allotment of Permanent Account Number (PAN) and Tax Collection and Deduction Account Number (TAN) to the new company. Following documents are needed to be submitted while registering a company in India.
Documents Required for Company Registration from Shareholders and Directors
A. Identity Proof Documents
1. Permanent Account Number
2. Aadhaar Card / Passport / Driving License / Voter Identity Card (at least one from the list)
B. Address Proof Documents
1. Telephone Bill / Mobile Bill
2. Electricity Bill / Water Bill
3. Copy of the Bank Passbook with latest transaction entry or Bank Statement (not more than 2 months old)
C. Passport size Photographs (3 each)
Important note: All the documents mentioned above must be Self Attested by the stakeholders involved. It is also advised to submit the latest documents and the telephone bill; the electricity bill should not be older than 2 months.
How to Register a Company Online?
Registering a company in India is now a simple 4-step process-
Step 1: Digital Signature Certificate (DSC)
As the registration process of the company is completely online, Digital signatures are required to file the forms on the MCA portal. DSC is mandatory for all the proposed directors and the subscribers of the Memorandum of Association (MoA) and Articles of Association (AoA).
DSC can be obtained from government recognised certifying authorities. Class 3 category of DSC must be obtained by the directors and subscribers of MoA and AoA.
Step 2: Director Identification Number (DIN)
The Director Identification Number (DIN) is an identification number for a director and it has to be obtained by anyone who wants to be a director in a company. The DIN of all the proposed directors of the company along with the name and the address proof are to be provided in the company registration form. DIN can be obtained while filing the SPICe+ form, i.e. company registration form.
SPICe+ is a web-based company registration form, through which DIN can be obtained for a maximum of three directors. If there are more directors in the company and they do not have a DIN, the company can be incorporated with three directors and it has to appoint new directors later on after incorporation. The appointed directors can obtain DIN by filing the DIR-3 form since only the proposed directors of an existing company can apply for DIN in the SPICe+ form.
Step 3: Registration on the MCA Portal
To apply for company registration, the SPICe+ form is to be filled out and submitted on the MCA portal. To fill out the SPICe+ form and submit documents, the director of the company has to register on the MCA portal. After registration, the director can log in and will obtain access to the MCA portal services which include filing e-forms and viewing public documents.
The company must also reserve its name by submitting two proposed names in the Part-A of the SPICe+ form. The reservation of the name is essential because if the company name is similar to the name of an existing/registered company, LLP, trademark or it contains words prohibited under the Companies (Incorporation Rules) 2014, the SPICe+ form will get rejected.
If the SPICe+ form gets rejected due to non-approval of the company name, the applicant has to re-file another SPICe+ form for the reservation of a new name by paying the prescribed fee. However, after the approval of the name filed in Part-A of the SPICe+ form, it will be reserved for a period of 20 days within which the company must fill Part-B of the SPICe+ form and submit the form online. The applicant must provide the details of the company and directors in the Part-B of the SPICe+ form, attach documents, attach DSC, check the form and submit it.
Step 4: Certificate of Incorporation
Once the registration application is filled and submitted along with the required documents, the Registrar of Companies will examine the application. Upon verification of the application, he will issue the Certificate of Incorporation of the Company.
The Certificate of Incorporation is issued with PAN and TAN as allotted by the Income Tax Department. An electronic mail with a Certificate of Incorporation as an attachment along with PAN and TAN will also be sent to the applicant.
Benefits of Company Registration in India
There are plenty of advantages of company registration for the business and business stakeholders in India. These advantages go beyond financial benefits and are essential for the future of the business owner and the organisation. Some of the highlighted benefits are:
Separate Legal Entity: Under the Companies Act, 2013, a registered company is a separate legal entity (from its directors and shareholders) and has its existence from a legal perspective. An incorporated company has its assets, debuts, and legal proceedings and thus, the liabilities of the individual company members are thus limited to the company debtors and creditors.
Perpetual Succession: As the word suggests, the company’s existence is everlasting even if the directors, members, shareholders change once the company has been registered. So long as the entity is compliant with the Companies Act, the incorporation will remain active.
Transferability of Shares: Once registered, the company’s shares can be transferred easily amongst different promoters and business stakeholders and the public as well in the case of a publicly listed company. There are few restrictions in a private limited company, but there can never be a complete ban on shares.
Guidelines About How to Choose Your Company Name
Choosing the right name for your company is significant as it will also become the brand identity of the business going forward. Registering the company name is easy, but there are few critical points that the applicant must keep in mind.
- The applicant must be aware that the proposed name should not match precisely with an existing name of any Limited Liability Partnership, company or Trademark.
- The format of the company name has to follow the guidelines as prescribed in the law. For example, a Private Limited company should have the name in the form of” ABC Pvt. Ltd.” Similarly, an OPC will have to register a name such as “XYZ (OPC) Private Limited.
- Generic names that may be related to a place are prohibited.
- The proposed name cannot include offensive words or violate the emblems or trademarks.
1. How to register a company name?
There are few necessary steps that the business owner must take to register the company name. The applicant (anyone on behalf of the company) must use the Reserve Unique Name (RUN) service on the MCA portal to reserve the desirable name.
2. How to check if a company is registered?
The person must visit the MCA portal to check if the company is successfully registered or not. Then, the person can visit the portal and click the “MCA Services” tab, a drop-down list with “View Company/LLP Master Data” options. On entering the company’s CIN number, the portal site will display the company’s exact registration status on the screen.
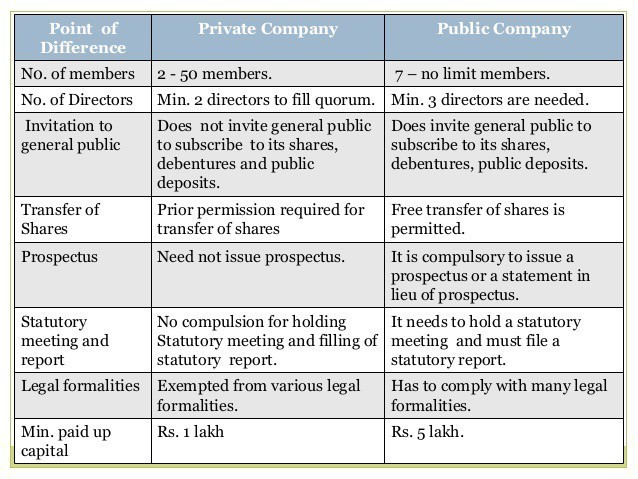
Difference between Private Limited Company and Public Limited Company :
How to Register a Private Limited Company in India
Following are the steps to register a Private Limited Company in India.
1. Put an application to get the Digital Signature Certificate
2. Apply for the DIN (Director Identification Number)
3. Check and send an application for the name availability
4. File the EMoa and EAOA to register the private limited company
5. Application for the PAN and TAN of the company
6. Get the Certificate of incorporation, issued by the Registrar of Company and PAN and TAN.
7. Open a current bank account in the company name.
How to Register a Public Limited Company in India
Step 1: Acquire DSC and DIN
One of the first things that need to be done is to get a director’s DSC (Digital Signature Certificate). Digital and electronic signatures both require the same information. The certifying authority issues this necessary document.
Furthermore, all proposed company directors must register for a Director Identification Number (DIN). The MCA has streamlined the process of acquiring a DIN; directors can apply simply by filling out the SPICe form.
Step 2: Submit Company Name
The next thing to do is to see if the desired company name is available on the MCA (Ministry of Corporate Affairs) website. After going to the MCA portal, choosing the MCA services and looking for name availability is the next step. The proposed name, however, must not replicate an existing trademark or service mark.
Step 3: Submission of SPICe+ Form
The applicant can apply for a Certificate of Incorporation by filing the SPICe+ form once the proposed name has been accepted. The applicant must also submit all necessary documents alongside the form, including a Memorandum of Agreement and Articles of Association.
Step 4: Certificate of incorporation
Certificates of Incorporation, complete with the company’s CIN (Corporate Identification Number) and the incorporation date, are issued once an entity’s formation paperwork has been received, processed, and approved by the appropriate authorities.
Step 5: Obtaining firm PAN and TAN
Once the company has its COI, the members and directors can apply to the MCA for a Permanent Account Number (PAN) and a Tax Deduction Account Number (TAN Registration) to be issued in the company’s name (Ministry of Corporate Affairs).
Step 6: Create a New Bank Account
It is now simple for the company’s members to create a savings account in the company’s name by providing the bank with the details from the PAN card and the COI.